 Crafting Homes for Pollinators: Woodworking and Bee Boxes
Woodworking plays a pivotal role in the world of beekeeping. From traditional Langstroth hives to more modern top-bar and Warre designs, the craft of constructing bee boxes is essential in providing safe and sustainable homes for these vital pollinators. The type of wood used to make these boxes can significantly impact the health and productivity of the bee colony. Types of Wood Used for Bee Boxes:
In conclusion, woodworking plays a vital role in the creation of bee boxes, offering beekeepers the opportunity to craft sustainable homes for these essential pollinators. Whether made from pine, cedar, cypress, fir, or reclaimed wood, these boxes are a testament to the harmony between human craft and the natural world. As we continue to recognize the importance of bees in our ecosystems, the art of crafting bee boxes will remain a significant facet of woodworking.
0 Comments
 Woodworking, as a craft, offers a limitless range of creative possibilities. One such project that is particularly popular and gratifying is the crafting of birdhouses. These structures, intended to provide safe havens for birds, are a delightful addition to any garden or outdoor space. When made with reclaimed wood, birdhouses become not only an eco-friendly choice but also a canvas for showcasing the wood's unique character. To ensure safety and quality, tools like the Lumber Wizard and Little Wizard play crucial roles.
Crafting Birdhouses from Reclaimed Wood: Reclaimed wood, sourced from old structures like barns, warehouses, or even discarded furniture, brings a touch of history and rustic charm to birdhouses. The wood's weathered appearance, unique grain patterns, and imperfections add a distinctive appeal to each birdhouse. Woodworking enthusiasts need to be mindful of the type of reclaimed wood they're using, ensuring it's safe for the birds. The wood should be free from harmful chemicals, like lead paint or treated wood products. Using the Lumber Wizard and Little Wizard for denailing: To ensure the reclaimed wood is safe and ready for crafting, tools like the Lumber Wizard and Little Wizard are invaluable. These are powerful handheld metal detectors designed specifically for woodworkers. The Lumber Wizard is an advanced tool capable of for denailing and helping in detecting of nails, screws, wires, and other metal fragments in all kinds of wood. It can be particularly helpful when working with reclaimed wood, which might contain hidden metal objects that could damage woodworking tools or harm the woodworker. The Little Wizard is a more compact version of the Lumber Wizard, perfect for smaller workshops or for woodworkers on a budget. Despite its size, it still offers impressive precision in detecting metal within wood. By using these denailing tools, woodworkers can ensure the reclaimed wood is safe and ready to be transformed into a beautiful birdhouse. In conclusion, the crafting of birdhouses from reclaimed wood is a woodworking project that blends creativity, sustainability, and love for nature. With tools like the Lumber Wizard and Little Wizard, woodworkers can ensure the safety and quality of their materials, resulting in birdhouses that are not only charming but also secure and durable. The process of denailing embodies the essence of woodworking – transforming raw, imperfect materials into objects of beauty and function.  Crafting Timeless Pieces: The History of Hat and Coat Stands and the Use of Reclaimed and Fell Wood in Woodworking
Hat and coat stands, functional and elegant additions to homes and offices, have a rich history that dates back to the Victorian era. In recent years, there has been a growing interest in crafting these timeless pieces from reclaimed wood and fell wood, showcasing the beauty of these materials while promoting sustainable practices in woodworking. The History of Hat and Coat Stands: Originating in the 19th century, hat and coat stands were essential in Victorian homes, where fashion etiquette dictated the use of hats and outerwear. As houses had limited closet space, these stands became a popular solution for storing these items. Early hat and coat stands were often made from wood and featured intricate designs, reflecting the craftsmanship of the era. Over the years, hat and coat stands have evolved in terms of design and materials, with metal and plastic versions becoming more common. However, wooden stands have remained popular due to their classic appeal and the versatility of woodworking. Reclaimed Wood in Hat and Coat Stands: Reclaimed wood, sourced from old structures like barns, houses, and warehouses, has gained popularity in woodworking for its unique character, history, and sustainability. Using reclaimed wood to create hat and coat stands offers an opportunity to showcase the natural beauty of aged wood while preserving its history. Each piece crafted from reclaimed wood tells a story, making it a conversation starter in any home or office. Fell Wood and its Role in Woodworking: Fell wood, sourced from trees that have been naturally uprooted or felled due to weather or age, is another sustainable material used in woodworking. Harvesting fell wood for denailing is an eco-friendly practice that prevents the wood from rotting or becoming a fire hazard. Utilizing fell wood for hat and coat stands not only respects the natural lifecycle of trees, but it also creates unique, one-of-a-kind pieces that celebrate the organic forms and imperfections of the wood. Hat and coat stands crafted from reclaimed and fell wood are not only functional and attractive, but they also embody a commitment to sustainability. By choosing to work with these materials, woodworkers showcase their dedication to preserving the environment and reducing waste, while still creating elegant and timeless pieces. In conclusion, the history of hat and coat stands is deeply rooted in the tradition of woodworking. By using reclaimed and fell wood, artisans continue to honor this heritage while embracing eco-friendly practices. These stands, made from materials with rich histories and natural beauty, are not only functional but also serve as a reminder of our responsibility to protect and cherish our environment. 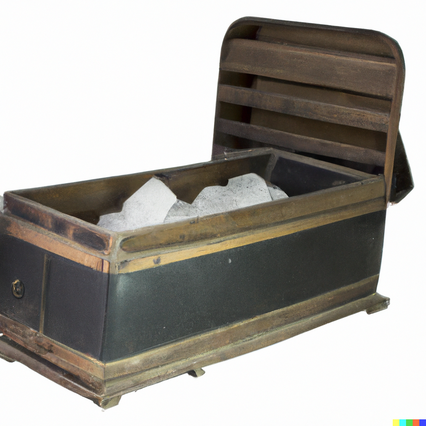 Revitalizing Tradition: Woodworking and Vintage Kitchen Iceboxes
Craftsmanship and nostalgia come together beautifully in the resurgence of vintage kitchen iceboxes, thanks to the art of woodworking. Known for their charming aesthetic and historical significance, these iceboxes are being transformed and repurposed in unique and functional ways. Dating back to the 19th century, iceboxes were the precursor to modern refrigerators. They were essentially insulated wooden boxes, often lined with zinc, tin, or slate, and filled with large blocks of ice to keep food items cool. The advent of electric refrigeration rendered these units obsolete, but they've been finding their way back into homes as decorative and functional pieces. Woodworking, the art of creating, assembling, or carving objects out of wood, plays a central role in the revitalization of these vintage kitchen iceboxes. Talented artisans use their skills to restore, modify, and enhance these iceboxes, giving them a new lease on life. The restoration process begins with a thorough assessment of the icebox's condition. This includes checking the integrity of the wooden structure and the internal lining. Damaged parts are repaired or replaced, and the entire piece is often sanded down to prepare it for the next steps. The woodworking skills truly shine in the modifications made to these vintage iceboxes. While some are restored to their original function with modern insulation techniques, others are repurposed into unique storage units, wine racks, or even kitchen islands. This is where the creativity of the artisan comes into play, as they use their understanding of wood properties and joinery techniques to transform the icebox into a functional piece that suits modern needs. Artisans often enhance the aesthetic appeal of these iceboxes, showcasing their woodworking skills through intricate carvings, adding custom-made wooden handles, or using techniques like wood burning to create designs. The finishing process, which may include staining, painting, or varnishing, further accentuates the natural beauty of the wood. Not only does this practice breathe new life into vintage kitchen iceboxes, but it also promotes sustainability. It is a clear nod to the 'reduce, reuse, recycle' philosophy, demonstrating how seemingly outdated items can be repurposed rather than discarded. In conclusion, the fusion of woodworking with vintage kitchen iceboxes provides an avenue for artisans to express their creativity, skill, and love for history. By giving these pieces a new purpose, we're preserving a piece of our past while creating functional art for our present. 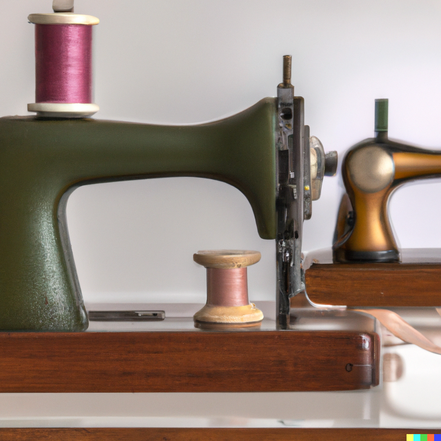 Woodworking and sewing might appear as two distinct crafts at first glance. Woodworking, traditionally seen as a rugged, heavy-duty craft, deals with the creation and manipulation of wood into useful and decorative items. On the other hand, sewing is often associated with delicate fabrics, intricate patterns, and the creation of clothing or other textile products. However, when these two disciplines cross paths, the result is an interesting synergy that unlocks a myriad of creative possibilities.
The Synergy of Woodworking and Sewing: There is a tangible relationship between woodworking and sewing. The combination of hard and soft materials, the juxtaposition of different textures, and the incorporation of both crafts into a single project can result in products that are not only functional but also aesthetically pleasing. From upholstered furniture to wooden accessories with fabric accents, the potential is as boundless as the creativity of the craftsperson. Upholstered Furniture: One of the most common intersections between woodworking and sewing is in the creation of upholstered furniture. Here, the solid structure of the furniture is crafted from wood, providing the necessary support and form. The comfort factor is introduced by the sewn elements, including the padding, cushions, and fabric coverings. Upholstery requires a mastery of both crafts. The woodworker must create a frame that not only stands up to use but also accommodates the upholstered components. The sewer, on the other hand, must tailor the fabric to fit the wooden structure perfectly. Wooden Accessories with Fabric Accents: Woodworking and sewing can also harmonize in smaller projects, like crafting wooden accessories with fabric accents. Examples include wooden jewelry boxes lined with soft fabric, wooden bags with fabric inserts, or even wooden bookmarks adorned with textile tassels. The contrast between the hardness of the wood and the softness of the fabric lends these items an engaging tactile quality. The combination also opens up a wealth of design possibilities, with the variety of wood types and grains matching the spectrum of fabric colors and patterns. Framing and Displaying Textiles: Another intriguing intersection of woodworking and sewing is the framing and display of textiles. This can range from traditional cross-stitch or embroidery pieces in wooden frames to the creation of larger display structures for textile art. The woodworking skills come into play to create frames or structures that enhance the textile work without overwhelming it. In turn, the textile work adds a visual and tactile warmth to the wood. Education and Workshop Possibilities: Given the crossover between these two crafts, there is an opportunity for educational programs and workshops that teach woodworking and sewing in tandem. These programs can demonstrate how the two crafts can complement each other, providing hands-on experience in making projects that incorporate both wood and fabric. Such workshops not only broaden the skill set of the participants but also encourage an appreciation for the range of possibilities that cross-disciplinary work can offer. Conclusion: The synergy between woodworking and sewing is a testament to the creative possibilities that can arise from the combination of different crafts. Each discipline contributes its strengths, resulting in products that are both inventiv and helpful.  Foosball is a beloved game across the globe, known for its fast-paced action and competitive spirit. The heart of the game lies in the foosball table, an intricate piece of craftsmanship often constructed from wood. In this article, we'll delve into the art of crafting a wooden foosball table, showing how woodworking contributes to the fun and excitement of this popular game.
The Significance of Wood in FoosballWood is a favored material for foosball tables due to its durability, stability, and aesthetic appeal. High-quality tables are often made from hardwoods like maple or oak, which can withstand the rough and tumble of the game while providing a beautiful finish. Additionally, wood offers a better playing experience, as it absorbs impact and allows for more precise ball control compared to other materials. Crafting a Wooden Foosball TableBuilding a foosball table is a woodworking project that requires precision, patience, and a bit of engineering know-how. Here's a general guide to get you started:
Ensuring Longevity of Your Wooden Foosball TableProper care and maintenance are essential to prolong the lifespan of your wooden foosball table. This includes cleaning the surface regularly, lubricating the rods, and storing the table in a dry, climate-controlled environment to prevent warping or damage from humidity. ConclusionCreating a wooden foosball table is a rewarding woodworking project that combines craftsmanship, creativity, and a love of games. It's a testament to the intersection of woodworking and play, demonstrating how quality materials and skilled workmanship can enhance the gaming experience. Whether you're a seasoned woodworker or a novice eager to take on a new challenge, crafting a foosball table offers an opportunity to hone your skills while creating a piece of functional entertainment for everyone to enjoy.  Bowling is a popular sport and recreational activity enjoyed by people of all ages across the globe. At the heart of the game are the wooden bowling pins and lanes, which showcase the undeniable connection between woodworking and bowling. In this article, we will delve into the art of crafting wooden bowling pins and lanes, and explore how woodworking has shaped the sport.
The Significance of Wood in BowlingWood has long been the preferred material for bowling equipment due to its durability, resilience, and natural beauty. It has been used in the construction of bowling lanes, as well as the crafting of bowling pins, which are typically made from hard maple or another hardwood. Using wood in bowling has several advantages:
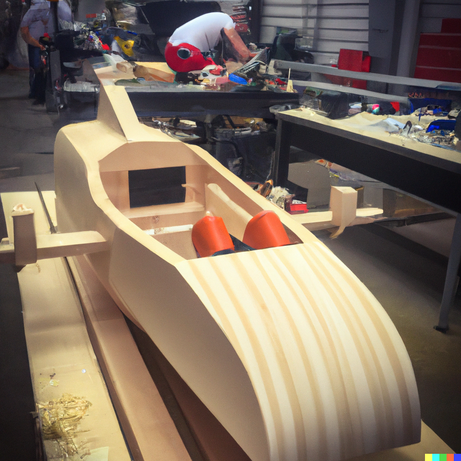 Woodworking is an ancient craft that has seamlessly made its transition into the modern era, continually evolving with innovative techniques and materials. Today, it's not just about crafting furniture or home decorations, but also extends to constructing creative projects such as soapbox racers. An emerging trend in the field is the use of reclaimed wood, an environmentally friendly material that adds a unique touch to every piece. In this article, we'll explore how you can build a soapbox racer using reclaimed wood.
The Allure of Reclaimed WoodReclaimed wood is timber that has been salvaged from older buildings, bridges, barns, and other structures, and repurposed for new uses. This wood often carries a rich history and unique characteristics, including distinct textures, colors, and marks from its previous life, that lend a unique charm to your projects. Moreover, using reclaimed wood aligns with the global push towards sustainability. By giving new life to old wood, we reduce the need for fresh lumber, thus helping to conserve forests and reduce landfill waste. When used in a project like a soapbox racer, reclaimed wood not only gives the piece an attractive, rustic look but also contributes to environmental conservation. Crafting a Soapbox Racer from Reclaimed WoodBuilding a soapbox racer from reclaimed wood is a project that combines creativity, woodworking skills, and a bit of engineering. Here's a general guide to get you started:
Building a soapbox racer from reclaimed wood is a project that encapsulates the beauty of woodworking. It's an opportunity to create something functional and fun while paying homage to the past and contributing to a sustainable future. Whether you're a seasoned woodworker or a novice, this project offers a rewarding experience that combines creativity, problem-solving, and hands-on skill. 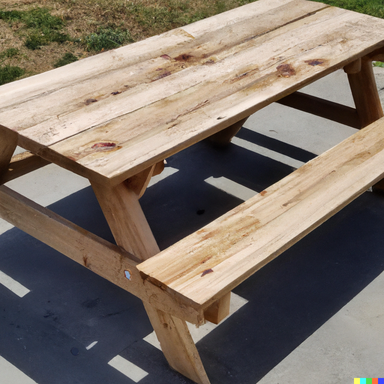 Crafting with a Conscience and the Help of Lumber Wizard and Little Wizard.
Woodworking is a craft that combines both art and practicality. It's a skill that goes back thousands of years, representing one of humankind's earliest ventures into crafting tools and structures. In recent years, woodworking has gained a renewed interest, with many people now embracing it as a hobby, a profession, or a means to build sustainable furniture. One such sustainable project that many woodworkers have turned to is creating picnic tables from reclaimed wood. A popular tool used in this process is the Lumber Wizard or its smaller counterpart, the Little Wizard. This article explores the process of woodworking using these tools and the benefits of utilizing reclaimed wood. The Charm of Reclaimed WoodReclaimed wood is gaining popularity among both consumers and creators for a variety of reasons. The charm of reclaimed wood lies in its history, character, and sustainability. This type of wood is typically salvaged from old barns, factories, warehouses, and other structures, providing a unique aesthetic that new lumber simply can't replicate. It carries marks of its past life, such as nail holes, saw marks, and weathering, that add a rustic charm to any piece of furniture. Moreover, using reclaimed wood is an excellent way to be environmentally friendly. By reusing old wood, we decrease the demand for new lumber, which helps to slow deforestation and reduces waste in landfills. So, by opting to build a picnic table from reclaimed wood, you're not just creating a unique piece of furniture, but also contributing to a more sustainable planet. The Role of the Lumber Wizard and Little WizardA critical aspect of working with reclaimed wood is ensuring it's safe and ready to use. This is where the Lumber Wizard or Little Wizard comes in handy. These are powerful handheld metal detectors designed specifically for woodworkers. Their main function is to locate metal objects such as nails, screws, and other potential hazards hidden within the wood. The Lumber Wizard has a wider scanning area and is suited for larger pieces of wood, while the Little Wizard, being more compact, is ideal for smaller projects and more intricate work. These tools are invaluable when working with reclaimed wood, as they help to prevent damage to your other tools and ensure the safety of the craftsman. Building a Picnic Table from Reclaimed WoodCreating a picnic table from reclaimed wood involves several stages:
Woodworking is a skill that is as rewarding as it is practical. By using reclaimed wood and tools such as the Lumber Wizard or Little Wizard, you can create beautiful and sustainable pieces like a rustic picnic table or other outdoor furniture items.  Woodworking and Scotch Whiskey have a rich and intertwined history that spans centuries. One of the most significant ways in which woodworking has played a role in Scotch Whiskey production is through the use of wooden barrels. In the early days of Scotch Whiskey production, wooden barrels were the only practical method for storing and transporting the liquor. The barrels were typically made from oak, which was readily available and had the right properties to impart flavor and character to the whiskey. The process of barrel-making, or cooperage, is a woodworking craft that requires great skill and precision. A skilled cooper can make a barrel that is watertight and has the desired flavor properties, while a poorly made barrel can ruin a batch of whiskey. The cooper's craft involves selecting the right wood, shaping the staves (the long, narrow pieces that make up the sides of the barrel), and fitting them together with hoops and other hardware. Once the barrels are made, they are filled with new-make spirit, which is essentially clear, un-aged whiskey. The spirit is then left to mature in the barrels for a period of several years. During this time, the whiskey absorbs the flavors and aromas of the wood, as well as some of the natural sugars and tannins in the wood. Different types of wood can be used for whiskey barrels, each imparting its own unique flavor and aroma to the whiskey. Oak is the most common wood used in Scotch Whiskey production, but other woods, such as cherry and chestnut, are sometimes used as well. In addition to the type of wood, the size and shape of the barrels can also affect the flavor and character of the whiskey. Traditionally, Scotch Whiskey barrels are made in a size known as a hogshead, which holds around 250 liters of liquid. However, smaller barrels, such as the 40-liter quarter cask, are becoming more popular, as they allow for more rapid maturation of the whiskey. Woodworking and Scotch Whiskey have a long and storied history, and the craft of cooperage remains an essential part of whiskey production today. The skilled craftspeople who make the barrels play a critical role in shaping the final flavor and character of the whiskey, ensuring that each bottle of Scotch is a unique and flavorful expression of the wood and the craft that went into making it.  Woodworking and model ship building have a long and intertwined history, with the tradition of crafting wooden ship models dating back centuries. Model ships have been created for various purposes, from serving as valuable tools in the shipbuilding industry to being treasured art pieces, and even as popular hobbies for maritime enthusiasts. Throughout history, woodworking has played an essential role in the construction of these intricate and detailed models.
Woodworking continues to play a significant role in model ship building, even as materials such as plastic, metal, and resin become more popular. Wooden model ships remain highly valued for their craftsmanship, beauty, and historical connection to the age of wooden shipbuilding. The art of wooden model ship building is still alive today, with hobbyists, artisans, and collectors all working to preserve the tradition and pass it down to future generations.  The Evolution of Woodworking and Gardening: A Historical Perspective on Tools and Techniques
Introduction: Woodworking and gardening are two ancient practices that have shaped human history in different ways. While woodworking has allowed us to create essential items for daily use and artistic expression, gardening has provided food, medicine, and aesthetically pleasing surroundings. In this article, we will explore the history of woodworking and gardening, focusing on the evolution of the tools and techniques used in both practices. I. Woodworking History A. Early Humans and Woodworking Woodworking dates back to the early stages of human civilization, as early humans relied on wood for constructing shelter, tools, and weapons. Archaeological evidence suggests that woodworking started with basic stone tools, such as axes and chisels, and eventually advanced to the use of metals like copper, bronze, and iron. B. Ancient Civilizations Ancient civilizations, such as the Egyptians, Greeks, and Romans, further developed woodworking techniques, creating elaborate wooden furniture, religious artifacts, and decorative items. In these cultures, woodworking was considered a valuable skill, and artisans were highly respected. C. The Middle Ages and Renaissance During the Middle Ages, woodworking became more specialized, with guilds dedicated to specific trades, such as carpenters, joiners, and turners. The Renaissance period saw the emergence of influential woodworking artists and designers, such as Grinling Gibbons, who created intricate carvings and wood sculptures. D. Modern Woodworking With the Industrial Revolution came mass production, new woodworking machinery, and the use of synthetic materials. In the 20th century, DIY woodworking gained popularity, leading to the development of power tools, such as circular saws and power drills. II. Gardening History A. Early Agricultural Societies Gardening began with the advent of agriculture, as early societies cultivated plants for food, medicine, and spiritual purposes. The earliest gardens were primarily functional, focusing on the production of sustenance. B. Ancient Gardens Ancient civilizations, such as the Egyptians, Mesopotamians, and Greeks, began to create ornamental gardens, incorporating elements like water features, shade structures, and decorative plants. These gardens were often symbols of wealth and power. C. Medieval and Renaissance Gardens During the Middle Ages, monastic gardens became centers of horticultural knowledge, as monks cultivated medicinal herbs, fruits, and vegetables. Renaissance gardens, influenced by humanism, celebrated the beauty of nature, using geometry, symmetry, and focal points to create visually striking spaces. D. Modern Gardening In the 18th and 19th centuries, gardening became a popular pastime for the middle class, and public parks and gardens were established. The development of new tools, such as the spade, hoe, and rake, made gardening more accessible. Today, gardening encompasses a wide range of styles and techniques, from organic gardening to hydroponics and vertical gardening. Conclusion: The history of woodworking and gardening reflects the development of human societies and our evolving relationship with nature. As we continue to refine our tools and techniques, we also deepen our appreciation for the creative possibilities of these ancient crafts.  Woodworking and bourbon barrels have a long and interesting history together. Bourbon is a type of American whiskey that is primarily produced in Kentucky, and the barrels used to age bourbon are made of American white oak, which is sourced from forests in Missouri, Kentucky, and Tennessee. The use of oak barrels in whiskey making dates back centuries, as the wood provides the whiskey with unique flavor and character. Bourbon barrels, in particular, are charred on the inside before being filled with the whiskey, which helps to filter out impurities and contributes to the distinctive smoky flavor of the bourbon. The process of making bourbon barrels involves a great deal of woodworking expertise. The barrels are typically made by skilled coopers, who select the finest quality American white oak and hand-craft the barrels using traditional methods. The staves, or individual wooden pieces that make up the barrel, are carefully selected and arranged to ensure a tight fit, and the heads of the barrel are shaped to precise specifications. The coopers use a variety of tools, including adzes, drawknives, and planes, to shape the wood and create a strong, leak-proof barrel. Once the barrel is constructed, it is charred on the inside, which involves burning the wood with an open flame to create a layer of char that helps to filter out impurities and contributes to the whiskey's flavor. The level of char can vary, with some bourbon distilleries opting for a lighter char for a smoother flavor, while others prefer a heavier char for a more robust flavor. Interestingly, bourbon barrels can only be used once for aging bourbon, as the wood loses its flavor and effectiveness after the first use. However, the barrels are often sold to other distilleries or used for other purposes, such as aging other types of whiskey or even as planters for flowers and herbs. In recent years, the woodworking and bourbon industries have seen a resurgence in popularity, with a growing interest in handcrafted, artisanal products. Many woodworking shops and cooperages are now offering tours and workshops, allowing visitors to learn about the history and craft of barrel making, as well as the art of aging bourbon. In conclusion, woodworking and bourbon barrels have a rich and fascinating history together, and the art of barrel making continues to be an integral part of the bourbon industry. From the careful selection of the finest American white oak to the skilled craftsmanship of the coopers, the process of making bourbon barrels is a testament to the beauty and craftsmanship of woodworking.  Woodworking and canoes have a rich history, with the craft of building wooden canoes dating back thousands of years across various cultures. The process of constructing a wooden canoe is an art form that requires great skill and knowledge of woodworking techniques.
Wooden canoes remain popular among enthusiasts and artisans for their beauty, craftsmanship, and connection to history. Many wooden canoe builders today are dedicated to preserving traditional techniques and passing them on to future generations. Workshops, classes, and organizations dedicated to the craft of wooden canoe building help keep these skills alive and encourage a continued appreciation for the historical significance and artistry of woodworking in canoe construction. 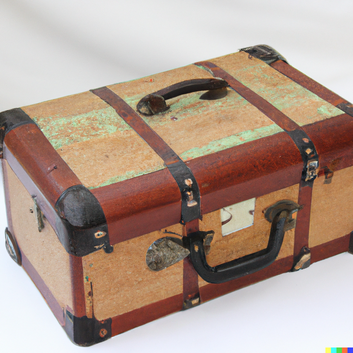 Woodworking and luggage share a historical connection, particularly in the earlier days of travel when wooden trunks and chests were common forms of luggage. Before the development of modern suitcases and travel bags, these wooden containers were essential for transporting personal belongings during journeys. The craftsmanship and woodworking techniques used in creating these luggage pieces played a significant role in their construction and design.
As travel evolved and became more accessible to the general population, the need for lighter, more portable luggage options led to the development of suitcases made from materials such as leather, fabric, and eventually plastic and other synthetic materials. Consequently, the use of wooden luggage has largely diminished, though antique wooden trunks and chests are still prized by collectors for their historical significance and craftsmanship. Today, woodworking continues to play a role in the production of luxury luggage, with high-end wooden boxes and cases crafted for specialty items such as watches, jewelry, and wine. These modern luggage pieces serve as a reminder of the historical connection between woodworking and the travel industry.  While woodworking and telephones may seem like two unrelated fields, they have a shared history, particularly in the early days of telephone technology. Telephones, invented in the 1870s by Alexander Graham Bell, relied heavily on wood for the construction of telephone poles, phone booths, and early telephone housings.
In the decades that followed, woodworking and telephone technology continued to evolve, and their connection gradually diminished. As plastics, metals, and other materials became more popular and cost-effective, wood was phased out as a primary material for telephone components. However, the early connection between woodworking and telephones remains an interesting historical intersection that reflects the early days of communication technology and the craftsmanship of the time.  Triple L Rustic Designs and Woodworking Skill are both YouTube channels that focus on woodworking, creating custom furniture, and sharing the passion for craftsmanship. Both channels offer unique approaches to woodworking, with different styles, techniques, and content. Let's take a closer look at each channel:
 Woodworking and television have a long and intertwined history. Many woodworking enthusiasts have learned their craft and honed their skills by watching television programs dedicated to the subject. Television programs that showcase woodworking techniques and projects are a valuable resource for both novice and experienced woodworkers.
Over the years, numerous woodworking shows have aired on television, providing viewers with valuable insights into the craft. Some popular woodworking TV shows include:
 Setting up a woodworking workshop requires various tools to carry out a wide range of tasks. Here's a list of essential tools you'll need to get started:
 Woodworking and wheels have a shared history that dates back thousands of years. The invention of the wheel is considered one of the most important milestones in human technological advancement, with wooden wheels being one of the earliest forms. Woodworkers have played a crucial role in the development and refinement of the wheel over time.
 National Woodworking Month is an annual observance in April that celebrates the craft of woodworking and the many benefits of working with wood. The month-long celebration is sponsored by the National Woodworking Association (NWA) and is an opportunity for woodworkers, hobbyists, and enthusiasts to showcase their skills and creations, as well as to promote the craft of woodworking to others.
During National Woodworking Month, many woodworking events are organized, such as workshops, classes, and demonstrations, to teach people about different woodworking techniques and to promote the craft. These events also provide an opportunity for woodworkers to network and share their knowledge and passion for woodworking with others. National Woodworking Month is also a time to highlight the many benefits of woodworking. Working with wood can be a rewarding and fulfilling hobby or profession that offers many benefits, such as stress relief, creativity, and the satisfaction of creating something with your own hands. Additionally, woodworking can also provide a sense of accomplishment, a source of income, and a way to connect with others who share the same interests. In summary, National Woodworking Month is an annual celebration of woodworking that provides an opportunity for woodworkers and enthusiasts to showcase their skills, promote the craft, and educate others about the many benefits of working with wood.  Woodworking and whiskey barrels have a long-standing relationship. In fact, the process of aging whiskey in wooden barrels is an integral part of the whiskey-making process. The barrels themselves are often made from oak, a sturdy and reliable hardwood that provides the perfect environment for whiskey to age and mature.
But woodworking and whiskey barrels go beyond just the aging process. The barrels themselves are often works of art, with intricate designs and carvings that showcase the skill and craftsmanship of the woodworker. And the barrels are not just for whiskey either - they can also be used for other alcoholic beverages such as wine and beer. When it comes to making whiskey barrels, there are several steps involved. The first step is selecting the right wood. Oak is the most common choice due to its ability to impart a rich and complex flavor to the whiskey. Once the wood is selected, it is shaped into staves that are then toasted or charred to enhance the flavor of the whiskey. After the staves are toasted or charred, they are assembled into barrels using specialized tools and techniques. The barrels are then tested for leaks and carefully inspected to ensure they meet the high standards required for aging whiskey. But the woodworking doesn't stop there. Once the whiskey has been aged in the barrel, the barrel itself can be repurposed into a variety of products such as furniture, home decor, and even art pieces. The natural patina and character of the wood make it a popular choice among woodworkers and artisans. In addition, the process of woodworking and aging whiskey barrels has become an art form in itself. There are now many woodworking courses and workshops that focus on creating and restoring whiskey barrels. These classes provide a unique opportunity for individuals to learn the craft of woodworking while also gaining an appreciation for the history and artistry of whiskey barrels. Overall, woodworking and whiskey barrels are intertwined in a way that is both practical and artistic. The skill and craftsmanship required to create and maintain these barrels is truly remarkable, and the end result is a product that is not only functional but also beautiful. Whether you are a whiskey connoisseur or a woodworking enthusiast, the world of woodworking and whiskey barrels is sure to capture your interest and imagination.  Selling woodworking creations to toy stores, gift shops, art galleries, furniture stores, and hardware stores can be a great way to turn your hobby into a business. Here are some tips to help you get started:
 Woodworking is an essential sector of the global economy, and it is one that has been expanding rapidly in recent years. The United States is one of the world's largest producers of woodworking machines, and it has been making significant strides in the industry, with its woodworking machine exports reaching $189 million in 2021.
The woodworking machine industry includes a wide range of equipment, including sawing machines, drilling machines, grinding machines, planing and milling machines, splitting and slicing machines, and bending and assembling machines. These machines are used in the woodworking industry to manufacture a variety of products, including furniture, building materials, and paper products. Exporting Woodworking Machines from the US In 2021, the United States became the 6th largest exporter of woodworking machines in the world, behind countries such as Germany, Italy, China, and Taiwan. The US's woodworking machine exports are a significant part of its machinery, mechanical appliances, and parts exports, which totaled $239.7 billion in 2021. The US exports a wide range of woodworking machines to countries all over the world. Some of the most popular products include sawing machines, planing and milling machines, and multi-purpose machines for woodworking. These machines are highly specialized and are designed to meet the specific needs of different woodworking industries. The Benefits of Exporting Woodworking Machines Exporting woodworking machines can be highly beneficial for the US economy. It provides revenue and employment opportunities for US businesses and workers, and it also helps to strengthen relationships with trading partners around the world. By exporting high-quality woodworking machines, the US is able to establish itself as a leading supplier of woodworking equipment on the global market. Exporting woodworking machines also helps to promote innovation and investment in the industry. Companies that export their machines to other countries are more likely to invest in research and development, which can lead to new and improved products that benefit both domestic and international markets. Challenges in the Woodworking Machine Industry While the woodworking machine industry is a significant part of the US economy, it does face some challenges. One of the biggest challenges is competition from other countries, particularly from countries with lower labor costs and less stringent environmental regulations. To remain competitive, US woodworking machine manufacturers must focus on innovation and quality. By developing new and improved machines that are more efficient and cost-effective, US manufacturers can continue to compete in the global market. Conclusion Overall, the US's position as the 6th largest exporter of woodworking machines in the world is a testament to the strength and competitiveness of its woodworking industry. By exporting high-quality machines to countries all over the world, the US is able to promote economic growth and establish itself as a leader in the industry. While the industry does face challenges, such as competition from other countries, US manufacturers are well-positioned to continue innovating and improving their products in the years to come.  Woodworking plays a vital role in the creation of picture frames, which are used to protect and display artwork, photographs, and other cherished items. Skilled woodworkers can craft a wide variety of frame styles, ranging from simple and modern to intricate and ornate. The process of creating wooden picture frames typically involves several woodworking techniques and tools.
In summary, woodworking is essential for creating custom picture frames that protect and showcase cherished artwork, photographs, and memorabilia. Skilled woodworkers can craft a wide variety of frame styles using various woodworking techniques, tools, and finishes. |
ScribesWritten by ChatGPT with guidance from Billy Carmen. Past Blog Posts
June 2023

|